[HOWTO] From snmptable to Graphs (Data Query walkthrough)

If you figure out how to do something interesting/cool in Cacti and want to share it with the community, please post your experience here.

Moderators: Developers, Moderators

User avatar
gandalf
Developer
Posts: 22383
Joined: Thu Dec 02, 2004 2:46 am
Location: Muenster, Germany
Contact:

[HOWTO] From snmptable to Graphs (Data Query walkthrough)

Post by gandalf »

Please see current version at http://docs.cacti.net!


Based on the question at HOWTO: build a graph set from snmpget output I'll try a walkthrough for Data Queries based on SNMP.

Chapter I: Building raw XML file
The starting point will be snmptable for a well know table of the HOSTS MIB:

Code: Select all

snmptable -c <community> -v 1 <host> HOST-RESOURCES-MIB::hrStorageTable
SNMP table: HOST-RESOURCES-MIB::hrStorageTable

 hrStorageIndex                                hrStorageType hrStorageDescr hrStorageAllocationUnits hrStorageSize hrStorageUsed hrStorageAllocationFailures
              1         HOST-RESOURCES-TYPES::hrStorageOther Memory Buffers               1024 Bytes       1035356         59532                           ?
              2           HOST-RESOURCES-TYPES::hrStorageRam    Real Memory               1024 Bytes       1035356        767448                           ?
              3 HOST-RESOURCES-TYPES::hrStorageVirtualMemory     Swap Space               1024 Bytes       1048568   0                           ?
              4     HOST-RESOURCES-TYPES::hrStorageFixedDisk              /               4096 Bytes       2209331        826154                           ?
              5     HOST-RESOURCES-TYPES::hrStorageFixedDisk           /sys               4096 Bytes             0   0                           ?
              6     HOST-RESOURCES-TYPES::hrStorageFixedDisk  /proc/bus/usb               4096 Bytes             0   0                           ?
              7     HOST-RESOURCES-TYPES::hrStorageFixedDisk          /boot               1024 Bytes        102454          9029                           ?
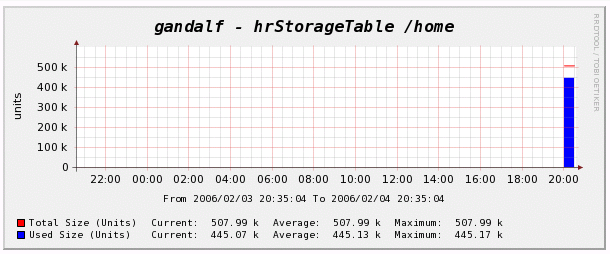
              8     HOST-RESOURCES-TYPES::hrStorageFixedDisk          /home               4096 Bytes        507988        446407                           ?
              9     HOST-RESOURCES-TYPES::hrStorageFixedDisk     /usr/local               4096 Bytes        507988         17133                           ?
             10     HOST-RESOURCES-TYPES::hrStorageFixedDisk           /var               4096 Bytes        507988        129429                           ?
             11     HOST-RESOURCES-TYPES::hrStorageFixedDisk /var/lib/nfs/rpc_pipefs               4096 Bytes             0            0                           ?
This given, the first step will be the definition of an xml file based on those OIDs. So change to your <path_cacti>/resources/snmp_queries directory and create a file named hrStorageTable.xml. You may of course choose your own name, but for me it seems appropriate to take the name of the SNMP Table itself. Before doing so, it is necessary to identify the Index of that table. Without looking at the MIB file, simply perform

Code: Select all

snmpwalk -c <community> -v 1 -On <host> HOST-RESOURCES-MIB::hrStorageTable|more
.1.3.6.1.2.1.25.2.3.1.1.1 = INTEGER: 1
.1.3.6.1.2.1.25.2.3.1.1.2 = INTEGER: 2
.1.3.6.1.2.1.25.2.3.1.1.3 = INTEGER: 3
.1.3.6.1.2.1.25.2.3.1.1.4 = INTEGER: 4
.1.3.6.1.2.1.25.2.3.1.1.5 = INTEGER: 5
.1.3.6.1.2.1.25.2.3.1.1.6 = INTEGER: 6
.1.3.6.1.2.1.25.2.3.1.1.7 = INTEGER: 7
.1.3.6.1.2.1.25.2.3.1.1.8 = INTEGER: 8
.1.3.6.1.2.1.25.2.3.1.1.9 = INTEGER: 9
.1.3.6.1.2.1.25.2.3.1.1.10 = INTEGER: 10
.1.3.6.1.2.1.25.2.3.1.1.11 = INTEGER: 11
.1.3.6.1.2.1.25.2.3.1.2.1 = OID: .1.3.6.1.2.1.25.2.1.1
.1.3.6.1.2.1.25.2.3.1.2.2 = OID: .1.3.6.1.2.1.25.2.1.2
The first index is .1.3.6.1.2.1.25.2.3.1.1.1, but the Index Base is .1.3.6.1.2.1.25.2.3.1.1. This OID is needed for the xml file:

Code: Select all

<interface>
        <name>Get hrStoragedTable Information</name>
        <description>Get SNMP based Partition Information out of hrStorageTable</description>
        <index_order_type>numeric</index_order_type>
        <oid_index>.1.3.6.1.2.1.25.2.3.1.1</oid_index>

        <fields>
                <hrStorageIndex>
                        <name>Index</name>
                        <method>walk</method>
                        <source>value</source>
                        <direction>input</direction>
                        <oid>.1.3.6.1.2.1.25.2.3.1.1</oid>
                </hrStorageIndex>
        </fields>
</interface>
Lets talk about the header elements

name: Short Name; chose your own one if you want
description: Long Name
index_order_type: numeric instead of alphabetic sorting
oid_index: the index of the table

There are more header elements, but for sake of simplification, we'll stick to that for now.

Lets turn to the fields. They correspond to the columns of the snmptable. For debugging purpose it is recommended to start with the Index field first. This will keep the XML as tiny as possible. The <fields> section contains one or more fields, each beginning with <field_description> and ending with </field_description>. It is recommended but not necessary to take the textual representation of the OID or an abbreviation of that.

name: Short Name
method: walk or get (representing snmpwalk or snmpget to fetch the values)
source: value = take the value of that OID as the requested value. Sounds ugly, but there are more options that we won't need for the purpose of this Howto
direction: input (for values that may be printed as COMMENTs or the like)
output (for values that shall be graphed, e.g. COUNTERs or GAUGEs)
oid: the real OID as numeric representation

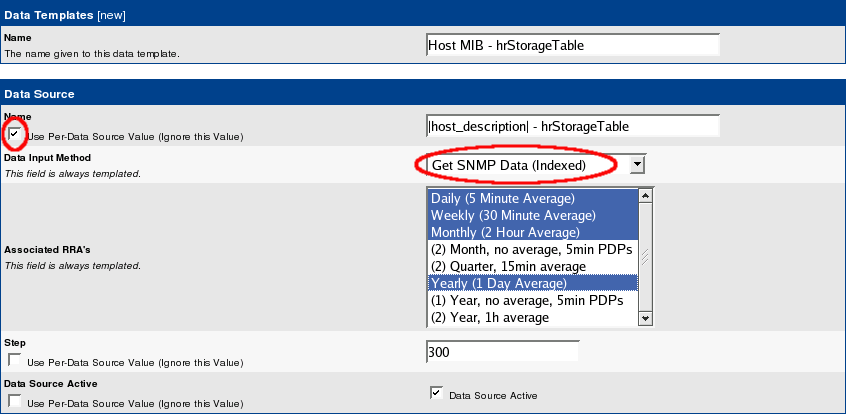
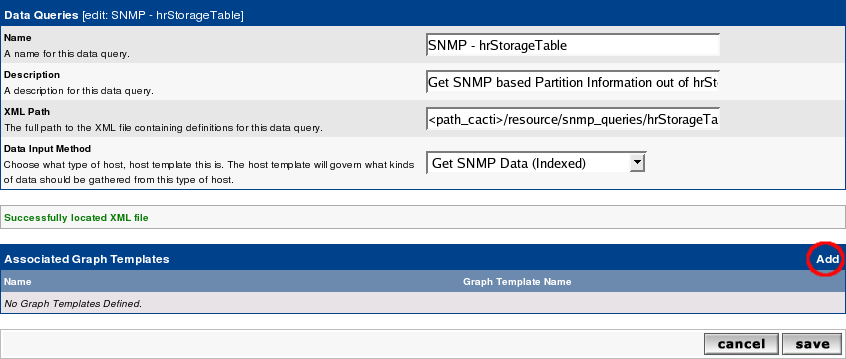
Now save this file and lets turn to cacti to implement this one. First, goto Data Queries to see
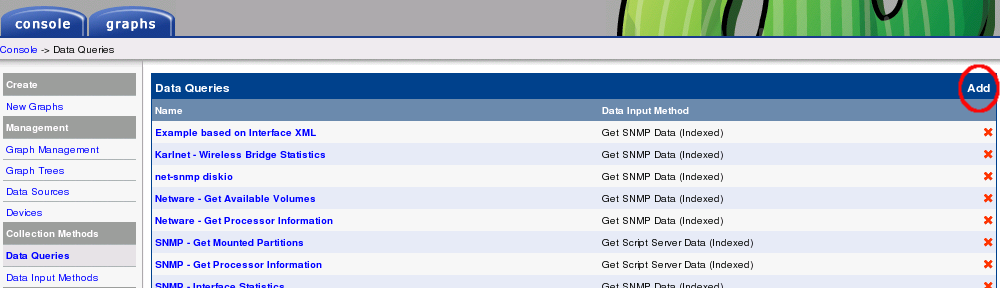
Image


and Add a new one:

Image


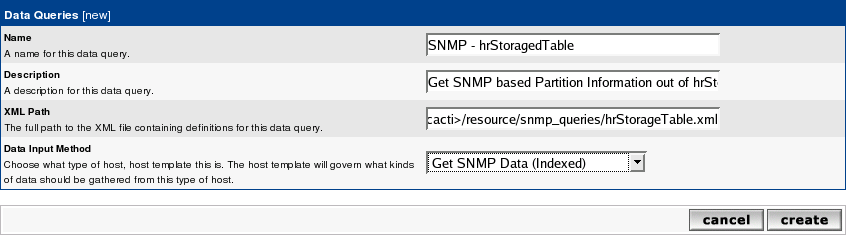
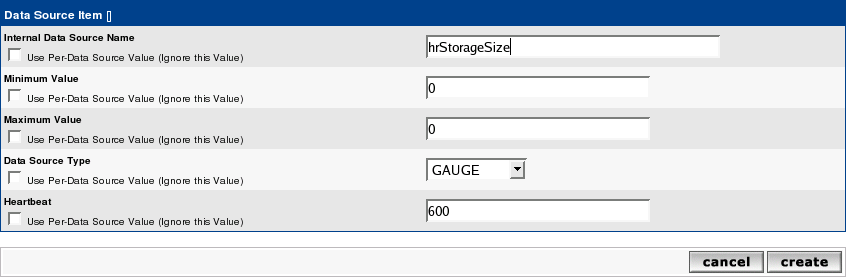
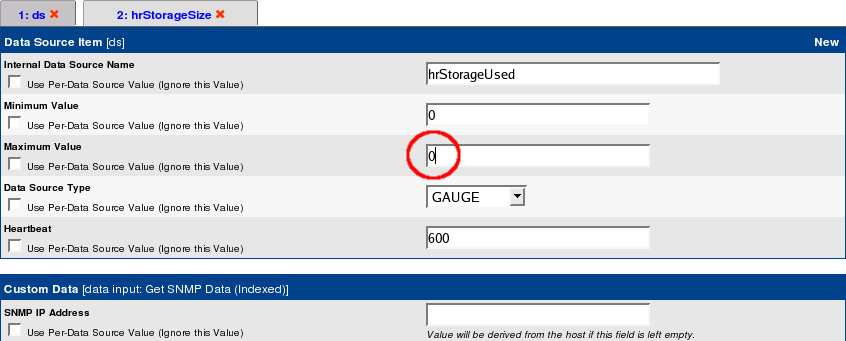
Fill in Short and Long Names at your wish. Enter the file name of the XML file and don't forget to choose Get SNMP Data (indexed). Create to see

Image


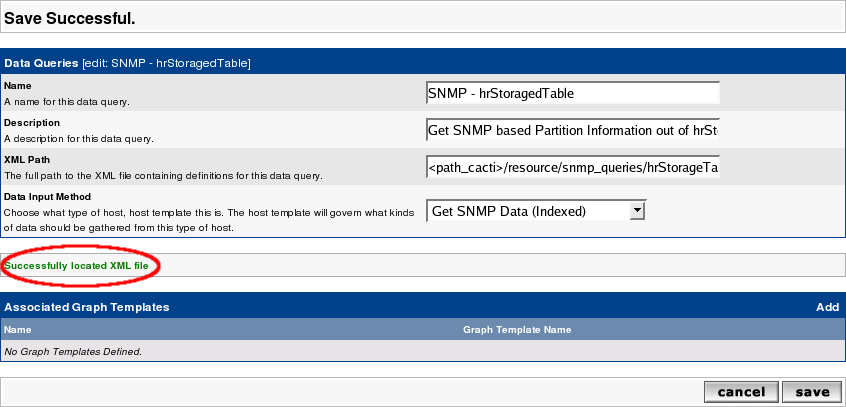
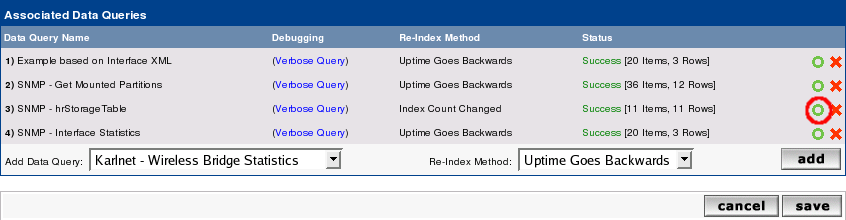
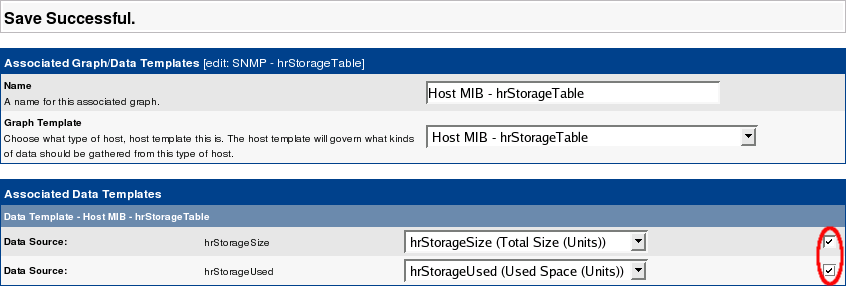
It has now Successfully located XML file. But this does not mean that there are no errors. So lets go on with that. Turn to the Device you want to query and add the new Data Query as shown:

Image


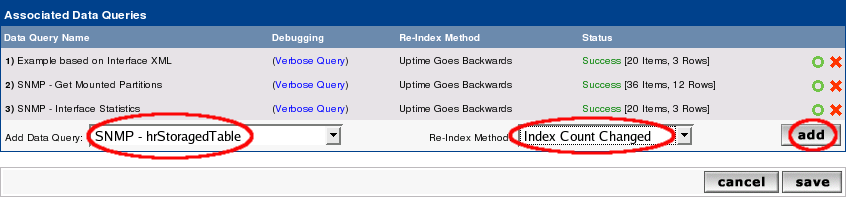
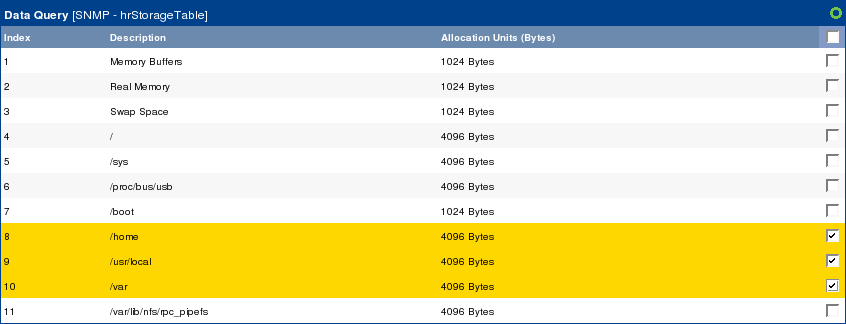
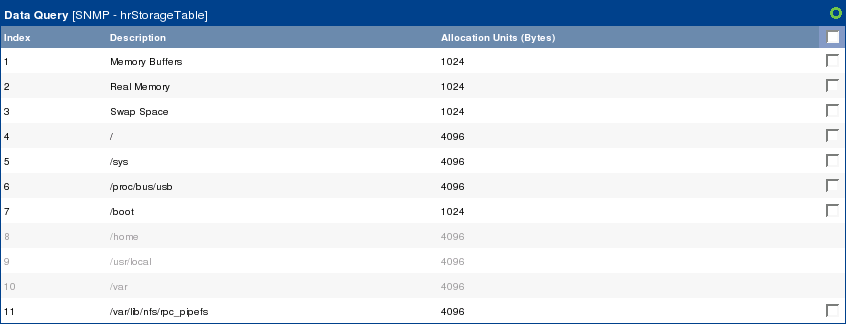
Index Count Changed was chosen on purpose to tell cacti to re-index not only on rebbot but each time the Index Count (e.g. number of partitions) changed. When done, see the results as

Image


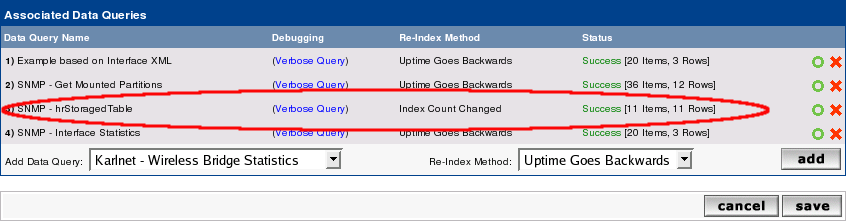
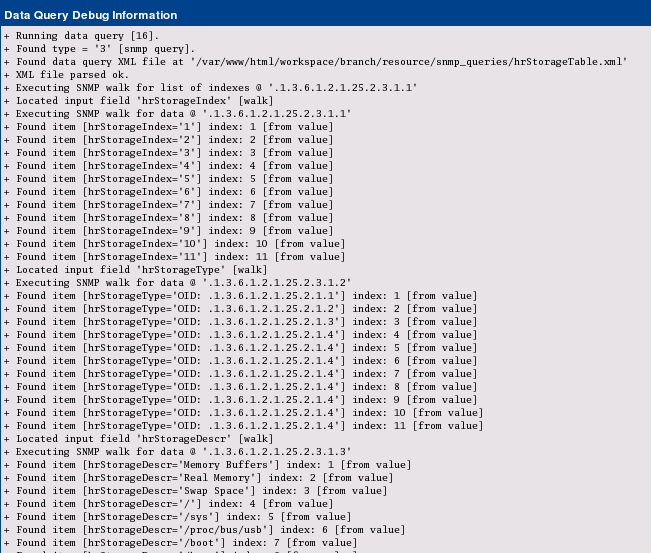
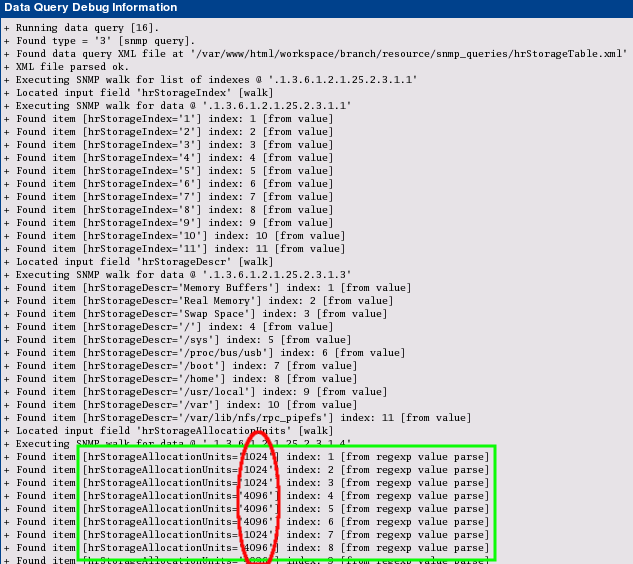
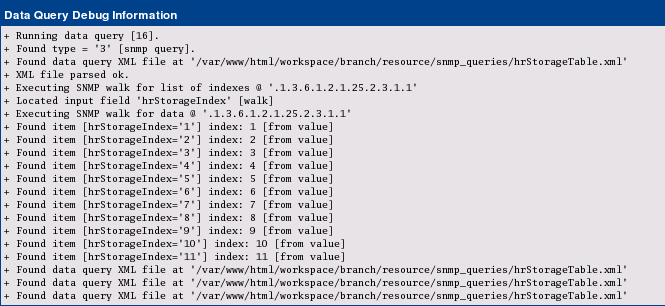
You'll notice, that on my laptop there are 11 indices = 11 partitions. So the XML worked up to now! To make this clear, select Verbose Query to see:

Image


This was the first step. More of this in the next post.
Reinhard
Last edited by gandalf on Wed Jun 18, 2008 1:29 pm, edited 5 times in total.
paulbeard206
Cacti User
Posts: 150
Joined: Sat Jul 30, 2005 2:15 pm

So far, so good

Post by paulbeard206 »

This is working and making sense so far.

Thanks.
User avatar
gandalf
Developer
Posts: 22383
Joined: Thu Dec 02, 2004 2:46 am
Location: Muenster, Germany
Contact:

Chapter II: Insert all descriptive table columns

Post by gandalf »

Chapter II: Insert all descriptive table columns
Now lets put all descriptive table columns into the SNMP Query XML file. This refers to
  • hrStorageType
  • hrStorageDescr
  • hrStorageAllocationUnits
I like to take the XML field names from the snmptable output, but this is not a must.

Code: Select all

<interface>
	<name>Get hrStoragedTable Information</name>
	<description>Get SNMP based Partition Information out of hrStorageTable</description>
	<index_order_type>numeric</index_order_type>
	<oid_index>.1.3.6.1.2.1.25.2.3.1.1</oid_index>

	<fields>
		<hrStorageIndex>
			<name>Index</name>
			<method>walk</method>
			<source>value</source>
			<direction>input</direction>
			<oid>.1.3.6.1.2.1.25.2.3.1.1</oid>
		</hrStorageIndex>
		<hrStorageType>
			<name>Type</name>
			<method>walk</method>
			<source>value</source>
			<direction>input</direction>
			<oid>.1.3.6.1.2.1.25.2.3.1.2</oid>
		</hrStorageType>
		<hrStorageDescr>
			<name>Description</name>
			<method>walk</method>
			<source>value</source>
			<direction>input</direction>
			<oid>.1.3.6.1.2.1.25.2.3.1.3</oid>
		</hrStorageDescr>
		<hrStorageAllocationUnits>
			<name>Allocation Units (Bytes)</name>
			<method>walk</method>
			<source>value</source>
			<direction>input</direction>
			<oid>.1.3.6.1.2.1.25.2.3.1.4</oid>
		</hrStorageAllocationUnits>
	</fields>
</interface>
The <name></name> information will later show up as a column heading. Don't forget to provide the correct base OIDs. Remember, that the Index will always be appended to those OIDs, e.g. the first Description will be fetched from OID = .1.3.6.1.2.1.25.2.3.1.3.1 (that is base OID = .1.3.6.1.2.1.25.2.3.1.3 together with the appended index .1 will form the complete OID .1.3.6.1.2.1.25.2.3.1.3.1.
Please notice, that all fields that will yield descriptive columns only take <direction>input</direction>
If you have completed your work, turn to the cacti web interface and select your host from the Devices list to see:

Image


Select the little green circle next to our SNMP XML to update your last changes. Then you'll see sth like:

Image


When using Verbose Query, you'll now find

Image


And clicking
Create Graphs for this host will result in

Image


You're not supposed to really create graphs at this moment, cause the XML is not yet complete. And you'll notice, that the second column does not present very useful information. So it may be omitted in later steps.

Reinhard
User avatar
gandalf
Developer
Posts: 22383
Joined: Thu Dec 02, 2004 2:46 am
Location: Muenster, Germany
Contact:

Chapter III: Get the Output Values

Post by gandalf »

Chapter III: Get the Output Values
Now lets modify the XML again. As said earlier, the second column is not very meaningful, so lets drop it. To get the output values, I appended the last two XML field descriptions, see:

Code: Select all

<interface>
	<name>Get hrStoragedTable Information</name>
	<description>Get SNMP based Partition Information out of hrStorageTable</description>
	<index_order_type>numeric</index_order_type>
	<oid_index>.1.3.6.1.2.1.25.2.3.1.1</oid_index>

	<fields>
		<hrStorageIndex>
			<name>Index</name>
			<method>walk</method>
			<source>value</source>
			<direction>input</direction>
			<oid>.1.3.6.1.2.1.25.2.3.1.1</oid>
		</hrStorageIndex>
		<hrStorageDescr>
			<name>Description</name>
			<method>walk</method>
			<source>value</source>
			<direction>input</direction>
			<oid>.1.3.6.1.2.1.25.2.3.1.3</oid>
		</hrStorageDescr>
		<hrStorageAllocationUnits>
			<name>Allocation Units (Bytes)</name>
			<method>walk</method>
			<source>value</source>
			<direction>input</direction>
			<oid>.1.3.6.1.2.1.25.2.3.1.4</oid>
		</hrStorageAllocationUnits>
		<hrStorageSize>
			<name>Total Size (Units)</name>
			<method>walk</method>
			<source>value</source>
			<direction>output</direction>
			<oid>.1.3.6.1.2.1.25.2.3.1.5</oid>
		</hrStorageSize>
		<hrStorageUsed>
			<name>Used Space (Units)</name>
			<method>walk</method>
			<source>value</source>
			<direction>output</direction>
			<oid>.1.3.6.1.2.1.25.2.3.1.6</oid>
		</hrStorageUsed>
	</fields>
</interface>
This works very much the same way as above.
  • provide the fields hrStorageSize and hrStoageUsed
  • provide a useful name
  • don't forget to specify <direction>output</direction>
  • give the corresponding base OIDs
Now we may proceed as said above: Pressing the green circle runs that XML definitions against the host and updates the rows/columns. You will notice the "missing" second column only when Create Graphs for this Host is selected.

Don't forget to set <direction>output</direction> for all variables/fields, that should be stored in rrd files and be graphed!. This is the mistake that occurs most often.

Reinhard
Last edited by gandalf on Sun Mar 26, 2006 4:53 am, edited 1 time in total.
User avatar
gandalf
Developer
Posts: 22383
Joined: Thu Dec 02, 2004 2:46 am
Location: Muenster, Germany
Contact:

Chapter IV: Defining the Data Template

Post by gandalf »

Chapter IV: Defining the Data Template
The Data Template will define, how the data is retrieved by the XML Query is saved. For more information about the principles of operation, please see HowTo: Using Data Queries and Data Input Methods. Please goto Data Templates and Add:

Image


Define the Name of the Data Template. When defining the Name of the Data Source, do not forget to check the Use Per-Data Source Value (Ignore this Value)
checkbox. This will come in useful later. Data Input Method will read Get SNMP Data (Indexed). Select Associated RRAs as usual (don't bother with my settings):

Image


Now to the Data Source Items. I like giving them the names of the MIB OIDs, see:

Image


and Create. Now enter the second Data Source Item:

Image


Please pay attention to setting the Maximum Value to 0 (zero). Else, all values exceeding the pre-defined value of 100 would be stored as NaN. Now scroll down to the bottom of the page and check Index Type, Index Value and Output Type Id

Image


Save and the Data Template is done.

Reinhard
User avatar
gandalf
Developer
Posts: 22383
Joined: Thu Dec 02, 2004 2:46 am
Location: Muenster, Germany
Contact:

Chapter V: Defining the Graph Template

Post by gandalf »

Chapter V: Defining the Graph Template
The Graph Template will define, how the data is presented. For more information about the principles of operation, please see HowTo: Using Data Queries and Data Input Methods. Please goto Graph Templates and Add:

Image


Fill in the header names and don't forget to check the Use Per-Graph Value (Ignore this Value) for the Graph Template Title:

Image


and Create.

Image


Now Add the first Graph Item as usual:

Image


Add the Legend and the second Graph Item:

Image


Again, add the Legend to end up with

Image


Reinhard
User avatar
gandalf
Developer
Posts: 22383
Joined: Thu Dec 02, 2004 2:46 am
Location: Muenster, Germany
Contact:

Chapter VI: Revisiting The Data Query

Post by gandalf »

Chapter VI: Revisiting The Data Query
According to HowTo: Using Data Queries and Data Input Methods we'll now have to revisit the Data Query

Image


Now Add the Associated Graph Templates and fill in a meaningsful name. Select the newly created Graph Template to see:

Image


Create:

Image


Select the correct Data Sources and check the boxes on the right. Save. Now fill in some useful Suggested Values, at first for the Data Template:

Image


Now apply suggested values for the Graph Template:

Image


Now the Data Query is complete:


Image


Reinhard
User avatar
gandalf
Developer
Posts: 22383
Joined: Thu Dec 02, 2004 2:46 am
Location: Muenster, Germany
Contact:

Chapter VII: Create Graphs for this Host

Post by gandalf »

Chapter VII: Create Graphs for this Host
Now we're almost done. Everything's ready for use now. So goto your device and select Create Graphs for this Host. Select some of the partitions you're interested in:

Image


and Create to see:

Image


Lets visit the Data Sources:

Image


As you can see, the Suggested Values of the Data Query defined the Name of the Data Template. So lets go to Graph Management:

Image


to see the title defined by the Suggested Values. When turning to the Graphs, you may see something like

Image


This might be the end of the show. While it should be enough to define some "easy" SNMP XML based Data Queries, there are some tricks and hints left to explain.
As you may have noticed, the quantities defined by this example are counted in Units, not Bytes. This is somewhat inconvinient but may be changed. Lets wait for the next Chapter ...
Reinhard
User avatar
gandalf
Developer
Posts: 22383
Joined: Thu Dec 02, 2004 2:46 am
Location: Muenster, Germany
Contact:

Chapter VIII: VALUE/REGEXP in Action

Post by gandalf »

Chapter VIII: VALUE/REGEXP in Action
As said above, with the current XML size values are measured in Units. The current Unit Size is given by hrStorageAllocationUnits, but the reading of it is like 4096 Bytes. To use this in any calculations, we must get rid of the string Bytes. This can be done by the VALUE/REGEXP Feature of cacti's XML definitions. So please change

Code: Select all

                 <hrStorageAllocationUnits>
                        <name>Allocation Units (Bytes)</name>
                        <method>walk</method>
                        <source>value</source>
                        <direction>input</direction>
                        <oid>.1.3.6.1.2.1.25.2.3.1.4</oid>
                </hrStorageAllocationUnits>
by

Code: Select all

                <hrStorageAllocationUnits>
                        <name>Allocation Units (Bytes)</name>
                        <method>walk</method>
                        <source>VALUE/REGEXP:([0-9]*) Bytes</source>
                        <direction>input</direction>
                        <oid>.1.3.6.1.2.1.25.2.3.1.4</oid>
                </hrStorageAllocationUnits>
To proove this, goto your device and again Verbose Query our Data Query to see:

Image


Now select Create Graphs for this Host and notice the change of the column Allocation Units (Bytes). The string "Bytes" has gone:

Image


To use these values, we define a CDEF:

Image


Notice, that with recent releases of cacti, it is possible to use |query_*| values within CDEFs. Finally, goto Graph Templates and use this CDEF with all Graph Items:

Image


Change the Base Value to 1024 for Bytes -> kBytes and the y-axis description to Bytes:

Image


Now the Graph looks like

Image


happy cacti-ing
Reinhard
Attachments
cacti_graph_template_host_mib_hrstoragetable.xml
The Graph Template
To import, you have to use cacti 0.8.6i at least
(14.82 KiB) Downloaded 4060 times
hrStorageTable.xml
XML file
put it into ./resources/snmp_queries
(1.25 KiB) Downloaded 3780 times
Last edited by gandalf on Tue Nov 28, 2006 1:30 pm, edited 1 time in total.
paulbeard206
Cacti User
Posts: 150
Joined: Sat Jul 30, 2005 2:15 pm

working with a different table: got a question

Post by paulbeard206 »

I am working with the DiskIO table, and got through part of this.

My snmpwalks seem to work on the command line but fail when they are parsed as XML files. For instance, I get 21 items on 9 rows: 21 is not evenly divisible by 9, last I checked, so something is wrong.

Code: Select all

+ Running data query [13].
+ Found type = '3' [snmp query].
+ Found data query XML file at '/usr/local/share/cacti/resource/snmp_queries/diskIOTable.xml'
+ XML file parsed ok.
+ Executing SNMP walk for list of indexes @ '.1.3.6.1.4.1.2021.13.15.1.1'
+ Located input field 'diskIOIndex' [walk]
+ Executing SNMP walk for data @ '.1.3.6.1.4.1.2021.13.15.1.1.1'
+ Found item [diskIOIndex='1'] index: 1 [from value]
+ Found item [diskIOIndex='2'] index: 2 [from value]
+ Found item [diskIOIndex='3'] index: 3 [from value]
+ Found item [diskIOIndex='4'] index: 4 [from value]
+ Found item [diskIOIndex='5'] index: 5 [from value]
+ Located input field 'diskIODevice' [walk]
+ Executing SNMP walk for data @ '.1.3.6.1.4.1.2021.13.15.1.1.2'
+ Found item [diskIODevice='ad0'] index: 1 [from value]
+ Found item [diskIODevice='ad1'] index: 2 [from value]
+ Found item [diskIODevice='acd0'] index: 3 [from value]
+ Found item [diskIODevice='fd0'] index: 4 [from value]
+ Found item [diskIODevice='md0'] index: 5 [from value]
+ Located input field 'diskIONRead' [walk]
+ Executing SNMP walk for data @ '.1.3.6.1.4.1.2021.13.15.1.1.3'
+ Found item [diskIONRead='1651043328'] index: 1 [from value]
+ Found item [diskIONRead='1964507136'] index: 2 [from value]
+ Found item [diskIONRead='8192'] index: 3 [from value]
+ Found item [diskIONRead='0'] index: 4 [from value]
+ Found item [diskIONRead='0'] index: 5 [from value]
+ Located input field 'diskIONWritten' [walk]
+ Executing SNMP walk for data @ '.1.3.6.1.4.1.2021.13.15.1.1.4'
+ Found item [diskIONWritten='No Such Instance currently exists at this OID'] index: 4 [from value]
+ Located input field 'diskIOReads' [walk]
+ Executing SNMP walk for data @ '.1.3.6.1.4.1.2021.13.15.1.1.5'
+ Found item [diskIOReads='No Such Instance currently exists at this OID'] index: 5 [from value]
+ Located input field 'diskIOWrites' [walk]
+ Executing SNMP walk for data @ '.1.3.6.1.4.1.2021.13.15.1.1.6'
+ Found item [diskIOWrites='No Such Instance currently exists at this OID'] index: 6 [from value]
+ Located input field 'diskIOLA1' [walk]
+ Executing SNMP walk for data @ '.1.3.6.1.4.1.2021.13.15.1.1.9'
+ Found item [diskIOLA1='No Such Instance currently exists at this OID'] index: 9 [from value]
+ Located input field 'diskIOLA5' [walk]
+ Executing SNMP walk for data @ '.1.3.6.1.4.1.2021.13.15.1.1.10'
+ Found item [diskIOLA5='No Such Instance currently exists at this OID'] index: 10 [from value]
+ Located input field 'diskIOLA15' [walk]
+ Executing SNMP walk for data @ '.1.3.6.1.4.1.2021.13.15.1.1.11'
+ Found item [diskIOLA15='No Such Instance currently exists at this OID'] index: 11 [from value]
+ Found data query XML file at '/usr/local/share/cacti/resource/snmp_queries/diskIOTable.xml'
Here's a working query result:

Code: Select all

UCD-DISKIO-MIB::diskIOIndex.1 = INTEGER: 1
UCD-DISKIO-MIB::diskIOIndex.2 = INTEGER: 2
UCD-DISKIO-MIB::diskIOIndex.3 = INTEGER: 3
UCD-DISKIO-MIB::diskIOIndex.4 = INTEGER: 4
UCD-DISKIO-MIB::diskIOIndex.5 = INTEGER: 5
UCD-DISKIO-MIB::diskIODevice.1 = STRING: ad0
UCD-DISKIO-MIB::diskIODevice.2 = STRING: ad1
UCD-DISKIO-MIB::diskIODevice.3 = STRING: acd0
UCD-DISKIO-MIB::diskIODevice.4 = STRING: fd0
UCD-DISKIO-MIB::diskIODevice.5 = STRING: md0
UCD-DISKIO-MIB::diskIONRead.1 = Counter32: 1651163136
UCD-DISKIO-MIB::diskIONRead.2 = Counter32: 1964881920
UCD-DISKIO-MIB::diskIONRead.3 = Counter32: 8192
UCD-DISKIO-MIB::diskIONRead.4 = Counter32: 0
UCD-DISKIO-MIB::diskIONRead.5 = Counter32: 0
UCD-DISKIO-MIB::diskIONWritten.1 = Counter32: 848595968
UCD-DISKIO-MIB::diskIONWritten.2 = Counter32: 1416077312
UCD-DISKIO-MIB::diskIONWritten.3 = Counter32: 0
UCD-DISKIO-MIB::diskIONWritten.4 = Counter32: 0
UCD-DISKIO-MIB::diskIONWritten.5 = Counter32: 0
UCD-DISKIO-MIB::diskIOReads.1 = Counter32: 9306100
UCD-DISKIO-MIB::diskIOReads.2 = Counter32: 8802233
UCD-DISKIO-MIB::diskIOReads.3 = Counter32: 4
UCD-DISKIO-MIB::diskIOReads.4 = Counter32: 0
UCD-DISKIO-MIB::diskIOReads.5 = Counter32: 0
UCD-DISKIO-MIB::diskIOWrites.1 = Counter32: 7803097
UCD-DISKIO-MIB::diskIOWrites.2 = Counter32: 15348293
UCD-DISKIO-MIB::diskIOWrites.3 = Counter32: 0
UCD-DISKIO-MIB::diskIOWrites.4 = Counter32: 0
UCD-DISKIO-MIB::diskIOWrites.5 = Counter32: 0
UCD-DISKIO-MIB::diskIOLA1.1 = INTEGER: 0
UCD-DISKIO-MIB::diskIOLA1.2 = INTEGER: 0
UCD-DISKIO-MIB::diskIOLA1.3 = INTEGER: 0
UCD-DISKIO-MIB::diskIOLA1.4 = INTEGER: 0
UCD-DISKIO-MIB::diskIOLA1.5 = INTEGER: 0
UCD-DISKIO-MIB::diskIOLA5.1 = INTEGER: 0
UCD-DISKIO-MIB::diskIOLA5.2 = INTEGER: 0
UCD-DISKIO-MIB::diskIOLA5.3 = INTEGER: 0
UCD-DISKIO-MIB::diskIOLA5.4 = INTEGER: 0
UCD-DISKIO-MIB::diskIOLA5.5 = INTEGER: 0
UCD-DISKIO-MIB::diskIOLA15.1 = INTEGER: 1
UCD-DISKIO-MIB::diskIOLA15.2 = INTEGER: 0
UCD-DISKIO-MIB::diskIOLA15.3 = INTEGER: 0
UCD-DISKIO-MIB::diskIOLA15.4 = INTEGER: 0
UCD-DISKIO-MIB::diskIOLA15.5 = INTEGER: 0
The XML file:

Code: Select all

<interface> 
       <name>Get diskIOTable Information</name> 
       <description>Get SNMP based disk IO Information out of diskIOTable</description> 
       <index_order_type>numeric</index_order_type> 
       <oid_index>.1.3.6.1.4.1.2021.13.15.1.1</oid_index> 
       <fields> 
              <diskIOIndex> 
                     <name>Index</name> 
                     <method>walk</method> 
                     <source>value</source> 
                     <direction>input</direction> 
                     <oid>.1.3.6.1.4.1.2021.13.15.1.1.1</oid> 
              </diskIOIndex> 
              <diskIODevice> 
                     <name>Device</name> 
                     <method>walk</method> 
                     <source>value</source> 
                     <direction>input</direction> 
                     <oid>.1.3.6.1.4.1.2021.13.15.1.1.2</oid> 
              </diskIODevice> 
              <diskIONRead> 
                     <name>Read (Bytes)</name> 
                     <method>walk</method> 
                     <source>value</source> 
                     <direction>input</direction> 
                     <oid>.1.3.6.1.4.1.2021.13.15.1.1.3</oid> 
              </diskIONRead> 
              <diskIONWritten> 
                     <name>Written (Bytes)</name> 
                     <method>walk</method> 
                     <source>value</source> 
                     <direction>input</direction> 
                     <oid>.1.3.6.1.4.1.2021.13.15.1.1.4</oid> 
              </diskIONWritten> 
              <diskIOReads> 
                     <name>Reads (Bytes)</name> 
                     <method>walk</method> 
                     <source>value</source> 
                     <direction>input</direction> 
                     <oid>.1.3.6.1.4.1.2021.13.15.1.1.5</oid> 
              </diskIOReads> 
              <diskIOWrites> 
                     <name>Writes (Bytes)</name> 
                     <method>walk</method> 
                     <source>value</source> 
                     <direction>input</direction> 
                     <oid>.1.3.6.1.4.1.2021.13.15.1.1.6</oid> 
              </diskIOWrites> 
              <diskIOLA1> 
                     <name>Load Average (1 min)</name> 
                     <method>walk</method> 
                     <source>value</source> 
                     <direction>input</direction> 
                     <oid>.1.3.6.1.4.1.2021.13.15.1.1.9</oid> 
              </diskIOLA1> 
              <diskIOLA5> 
                     <name>Load Average (5 min)</name> 
                     <method>walk</method> 
                     <source>value</source> 
                     <direction>input</direction> 
                     <oid>.1.3.6.1.4.1.2021.13.15.1.1.10</oid> 
              </diskIOLA5> 
              <diskIOLA15> 
                     <name>Load Average (15 min)</name> 
                     <method>walk</method> 
                     <source>value</source> 
                     <direction>input</direction> 
                     <oid>.1.3.6.1.4.1.2021.13.15.1.1.11</oid> 
              </diskIOLA15> 
       </fields> 
</interface>

Yes, the values 7 and 8 are skipped.
User avatar
gandalf
Developer
Posts: 22383
Joined: Thu Dec 02, 2004 2:46 am
Location: Muenster, Germany
Contact:

Post by gandalf »

Those values that you want cacti to measure and place into rrd files must be of

Code: Select all

<direction>output</direction>
This should hold for diskIONRead, diskIONWritten and so on.
See Chapter I and Chapter III (last few fields of the example).
Reinhard
paulbeard206
Cacti User
Posts: 150
Joined: Sat Jul 30, 2005 2:15 pm

wOOt!

Post by paulbeard206 »

Thanks for the tip. That works like a champ.

I'll test these a bit and then export them so others can apply them.

One more question, though: how can I get the disk device name to appear in the graphs? I am using a different table: is there some magic[tm] way to pull that out of the xml file?
User avatar
gandalf
Developer
Posts: 22383
Joined: Thu Dec 02, 2004 2:46 am
Location: Muenster, Germany
Contact:

Post by gandalf »

You refer to the DiskIODevice field of your XML? Use |query_DiskIODevice| as a variable name in your Graph Template (or even in your Data Template). Its very much like |query_hrStorageDescr| in Chapter VI. So you may even use it with Suggested Values
Reinhard
paulbeard206
Cacti User
Posts: 150
Joined: Sat Jul 30, 2005 2:15 pm

query_DiskIODevice isn't working for me

Post by paulbeard206 »

This all seems to have come together and I learned a thing or three about how cacti works. I'm not seeing as much data in those graphs, and I'm not sure why that is (the command line queries are no different, so it's not a cacti issue).

update: I deleted and recreated the graphs and now the query_DiskIODevice header works.

Now that I look at this, I see the wrong data is being picked up: I am getting Reads from one device and Writes from the other, and vice versa.

If I remove both graphs and create just one, it picks up the reads from both, plotted as reads and writes from just one.

Very puzzling . . . .
paulbeard206
Cacti User
Posts: 150
Joined: Sat Jul 30, 2005 2:15 pm

more questions

Post by paulbeard206 »

got another question:

Code: Select all

/usr/local/bin/rrdtool create \
/usr/local/share/cacti/rra/red_load_1min_177.rrd \
--step 300  \
DS:Load_1min:GAUGE:600:0:U \
DS:Load_5min:GAUGE:600:0:U \
DS:Load_15min:GAUGE:600:0:U \
RRA:AVERAGE:0.5:1:600 \
RRA:AVERAGE:0.5:6:700 \
RRA:AVERAGE:0.5:24:775 \
RRA:AVERAGE:0.5:288:797 \
RRA:MIN:0.5:1:600 \
RRA:MIN:0.5:6:700 \
RRA:MIN:0.5:24:775 \
RRA:MIN:0.5:288:797 \
RRA:MAX:0.5:1:600 \
RRA:MAX:0.5:6:700 \
RRA:MAX:0.5:24:775 \
RRA:MAX:0.5:288:797 \
RRA:LAST:0.5:1:600 \
RRA:LAST:0.5:6:700 \
RRA:LAST:0.5:24:775 \
RRA:LAST:0.5:288:797
As you can see from the attached, only two data sources are recognized, though the RRD definition sees three.

update I removed and re-did the templates and now they seem to work: all three data sources show up.

But as often happens, one thing gets fixed and another breaks.

I see these results on the command line:

Code: Select all

snmpget red .1.3.6.1.4.1.2021.13.15.1.1.9.1 .1.3.6.1.4.1.2021.13.15.1.1.9.2 .1.3.6.1.4.1.2021.13.15.1.1.9.3
UCD-DISKIO-MIB::diskIOLA1.1 = INTEGER: 34
UCD-DISKIO-MIB::diskIOLA1.2 = INTEGER: 21
UCD-DISKIO-MIB::diskIOLA1.3 = INTEGER: 0
Check out the graph I get, though (yes, I know the colors need work): I have also posted a screen grab of my Graph Template.
Attachments
where do these whack values come from?
graph_image.php.png (21.38 KiB) Viewed 80831 times
my graph template
my graph template
graph_template.jpg (113.33 KiB) Viewed 80831 times
why just 2 data sources?
why2.jpg (68.43 KiB) Viewed 80833 times
Post Reply

Who is online

Users browsing this forum: No registered users and 0 guests